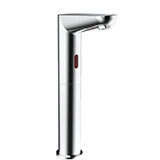
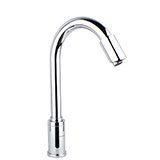
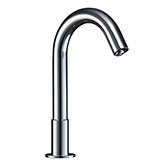
ATX-0049 | SENSOR TAP WITH INTEGRATED SPOUT SENSOR

Swan-neck 'deck-mounted' sensor tap with integrated 'fibre-optic' spout sensor Intelligent 'auto-adjust' sensor distance

ATX-0049

Short swan-neck design monobloc automatic sensor tap 

Features:
Swan-neck 'deck-mounted' with integrated 'fibre-optic' spout sensor
Intelligent 'auto-adjust' sensor distance
Height: 241mm
Conserve water and Hygienic
Power Options: AC+DC Powered: Mains/4XAA Alkaline batteries (Up-to 2yr lifespan)
Hands free infrared activation
Exquisite and stylish design
Solid brass construction 
New control box design: ACB-0112 
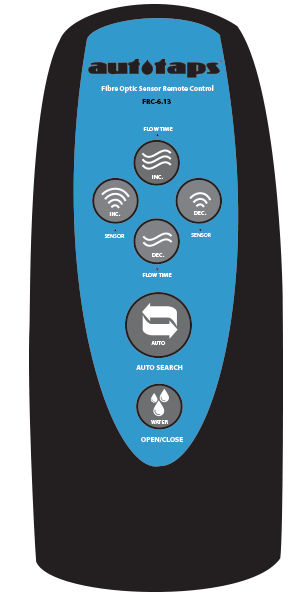
Compatible with FRC-613 Remote Control 
Water pressure required: 0.50 -7 Bar (1 bar or above for best performance)

Note:
This is a single-supply sensor tap. To regulate/mix hot and cold water together, a thermostatic mixer valve or a blending valve will be required.

Water Feed: Single supply
Finish: Chrome-plated
Type: Deck-mounted

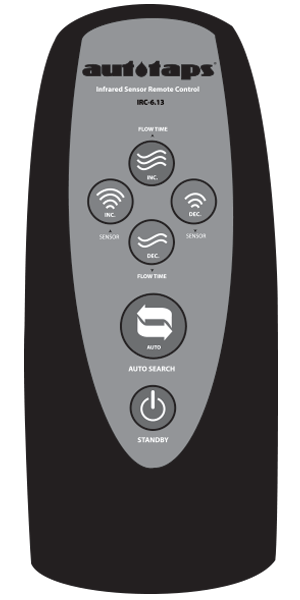
Remote Control: FRC-613 
This automatic tap is compatible with IRC-613 Sensor Remote Control (Sold separately)

Power Option
Batteries and Mains (Both power options supplied)
Supplied with 3-pin UK AC plug

Drilling a hole?
32mm

Water Pressure
0.75bar (Minimum) - 1bar (Recommended).

Buy Product

Lorem Ipsum

Lorem ipsum dolor sit amet, consectetur adipiscing elit. Nunc quam urna, dignissim nec auctor in, mattis vitae leo. Lorem ipsum dolor sit amet, consectetur adipiscing elit.

Lorem Ipsum

Lorem ipsum dolor sit amet, consectetur adipiscing elit. Nunc quam urna, dignissim nec auctor in, mattis vitae leo. Lorem ipsum dolor sit amet, consectetur adipiscing elit.

Display 5.2"
Camera 12MP
RAM 4GB
OS iOS

Incredible product

John Smith, 20 Jan 2018

Lorem ipsum dolor sit amet, consectetur adipiscing elit. Donec augue nunc, pretium at augue at, convallis pellentesque ipsum. Lorem ipsum dolor sit amet, consectetur adipiscing elit.

Incredible product

John Smith, 20 Jan 2018

Lorem ipsum dolor sit amet, consectetur adipiscing elit. Donec augue nunc, pretium at augue at, convallis pellentesque ipsum. Lorem ipsum dolor sit amet, consectetur adipiscing elit.

Incredible product

John Smith, 20 Jan 2018

Lorem ipsum dolor sit amet, consectetur adipiscing elit. Donec augue nunc, pretium at augue at, convallis pellentesque ipsum. Lorem ipsum dolor sit amet, consectetur adipiscing elit.


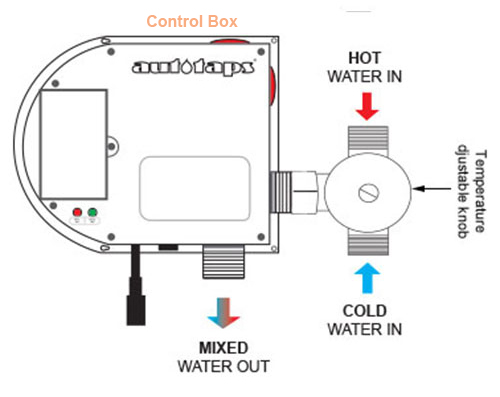
Control box: Diameter of 'inlet' pipe: G1/2”
Control box: Diameter of 'outlet' pipe: G1/2”
Water pressure range: 0.75 (Min) - 7 Bar (Max)
Voltage: DC6V or AC220V-240V (6V Output)
Power consumption: =0.3mW
Sensing distance: 6-24cm
Respond time: 1 Second
Battery Consumption (DC): 4xAA alkaline batteries (up-to 2yr lifespan depending on level of usage)
Silent Consumption: 0.003mW
Environment Temperature: 1-45 C
Flow Rate: 6L/Per minute
Pipe Threading: British Standard Whitworth (BSW) 
Noise Class: 1
Finish: Chrome-plated
Voltage: DC6V or AC220V-240V (6V Output)


REMOTE CONTROL: FRC-613 FUNCTIONS
FLUSH/RUN Water: Flow Time Increase
When this button is pressed once, it will increase water flush/flow time by ‘5 seconds’. Each key press represents 5 seconds ‘flow time’ increment.

HOW TO: 
With remote control facing/pointing towards the sensor, press once, a solid LED light comes on first and briefly followed by 3 LED light flashes. Each key press increases water flow time by 5s. For example, press 1 time =5s, press 2 times= 10s, 3 times= 15s etc.

NOTE: 
Each key press must be registered by sensor module first before setting another parameter. For example, if you want the tap to run for 10 seconds, press this key once and let it register (which equals 5s) and press it again the second time to increase it from 5s to 10s and so on.
FLUSH/RUN Water: Flow Time Decrease
When this button is pressed once, it will decrease water flush/flow time by ‘5 seconds’. Each key press represents 5 seconds ‘flow time’ decrement.

HOW TO: 
With remote control facing/pointing towards the sensor, press once, LED light flashes 3 times. Each key press will decreases water flow time by 5s. For example, press 1 time =-5s, press 2 times= -10s, 3 times= -15s etc.

NOTE: 
Each key press must be registered by sensor module first before setting another parameter. For example, if you want the flow time to be decreased by 10 seconds, press this key once and let it register (which equals -5s) and press it again the second time to decrease it from 10s to 5s and so on.
Increase Sensor Distance
This button will increase the sensor distance by/between 2-5cm.

HOW TO: 
With remote control facing/pointing towards the sensor, press once, a solid LED light comes on first and briefly followed by 3 LED light flashes. Each key press increases sensor proximity zone, and represents 2-5cm increment.

*Sensor distance range scope is around/between 7cm-35cm
Decrease Sensor Distance
This button will decrease the sensor proximity distance by/between 2-5cm.

HOW TO: 
With remote control facing/pointing towards the sensor, press once, a solid LED light comes on first and briefly followed by 2 LED light flashes. Each key press increases sensor proximity zone, and represents 2-5cm increment.

*Sensor distance range scope is around/between 7cm-35cm
Auto Search
This button allows the 'automatic' settings of the sensor proximity sensor range. 

HOW TO: 
With remote control facing/pointing towards the sensor, press once, a solid LED light comes on first and briefly followed by 5 LED light flashes. During these flashes, the sensor will auto-calibrate itself and adjust its infrared distance settings in accordance with environment. 

This button can also be used to set the sensor distance manually. 

For example, once this button is pressed, place hand/object at desired position/distance where you want sensor range to end and it will automatically calculate the distance from sensor module to hand/object.
Water ON/OFF
When this button is pressed, it will open the valve and let water flow, and when it’s pressed again –

the valve will close and water will stop (ON and OFF activation). But once activated and the button

is not pressed – water will continue to run for ‘120 seconds’ then it will shut OFF or close the valve automatically.

Note:;
This function can be intercepted or interrupted at any time. For example, if the button is pressed and after, for example, 30s, the button can be pressed again to close the valve


1x Sensor Tap (with flexible hose attached)
1x Control Box (*battery compartment inside)
1x AC cable (UK plug)
1x Transformer (Built inside control box)
1x Control box 'wall-mounting' clip 
Fittings and Screws


Nothing to display.


OPTION 1: ATV-9004C


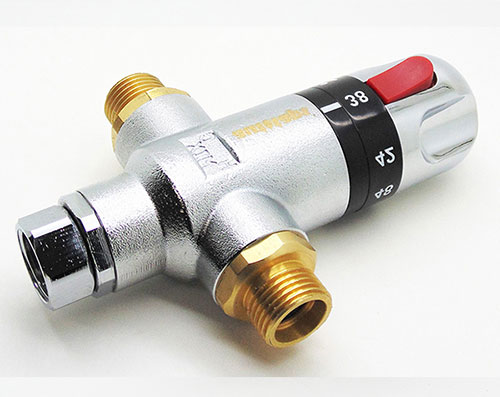
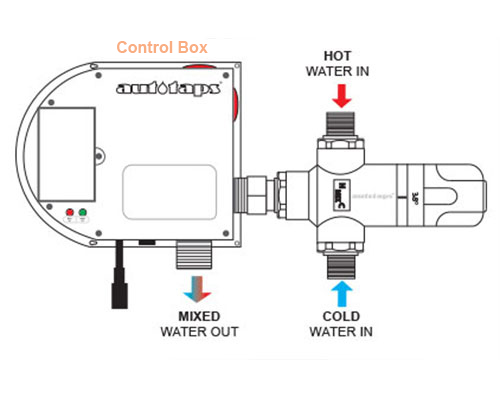
Thermostatic Mixer Valve 
This thermostat can be connected directly to the control box using its 1/2" female outlet connector. This method is usually the quickest way to setup installation.

OPTION 2: ATV-9004B


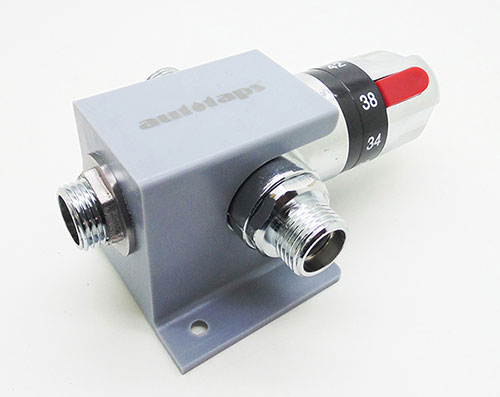
Thermostatic Mixer Valve (with wall bracket)
This thermostat has a 'wall-mounting' bracket that can be mounted on the wall and linked to the control box 'inlet' via a connecting pipe or a flexible hose (not supplied).

TIP:
You can run up-to three (3) sensor taps (maximum) with one thermostat. Water pressure of both hot and cold supplies must be at least 3 bar.

OPTION 3: ABV-0012


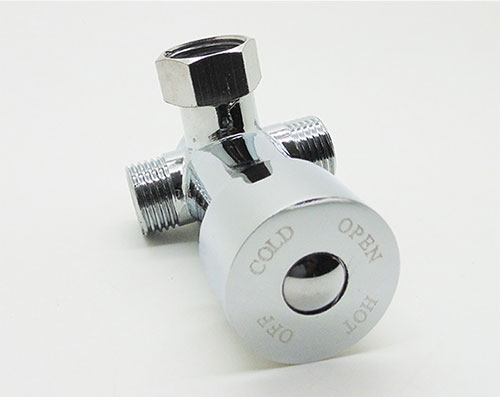
Manual Blending Valve 
This is a manual blending valve, adjustable by hand only. There's no thermostatic mixing element inside. Any desired temperature can only be achieved 'manually' by turning the knob clockwise or anti-clockwise by hand.

IRC-613 REMOTE CONTROL
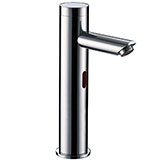
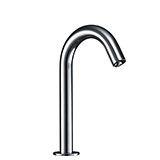
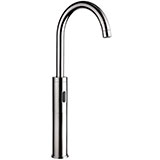


FLUSH/RUN Water: Flow Time Increase
When this button is pressed once, it will increase water flush/flow time by ‘5 seconds’. Each key press represents 5 seconds ‘flow time’ increment.

HOW TO: 
With remote control facing/pointing towards the sensor, press once, a solid LED light comes on first and briefly followed by 3 LED light flashes. Each key press increases water flow time by 5s. For example, press 1 time =5s, press 2 times= 10s, 3 times= 15s etc.

NOTE: 
Each key press must be registered by sensor module first before setting another parameter. For example, if you want the tap to run for 10 seconds, press this key once and let it register (which equals 5s) and press it again the second time to increase it from 5s to 10s and so on.
FLUSH/RUN Water: Flow Time Decrease
When this button is pressed once, it will decrease water flush/flow time by ‘5 seconds’. Each key press represents 5 seconds ‘flow time’ decrement.

HOW TO: 
With remote control facing/pointing towards the sensor, press once, LED light flashes 3 times. Each key press will decreases water flow time by 5s. For example, press 1 time =-5s, press 2 times= -10s, 3 times= -15s etc.

NOTE: 
Each key press must be registered by sensor module first before setting another parameter. For example, if you want the flow time to be decreased by 10 seconds, press this key once and let it register (which equals -5s) and press it again the second time to decrease it from 10s to 5s and so on.
Increase Sensor Distance
This button will increase the sensor distance by/between 2-5cm.

HOW TO: 
With remote control facing/pointing towards the sensor, press once, a solid LED light comes on first and briefly followed by 3 LED light flashes. Each key press increases sensor proximity zone, and represents 2-5cm increment.

*Sensor distance range scope is around/between 7cm-35cm
Decrease Sensor Distance
This button will decrease the sensor proximity distance by/between 2-5cm.

HOW TO: 
With remote control facing/pointing towards the sensor, press once, a solid LED light comes on first and briefly followed by 2 LED light flashes. Each key press increases sensor proximity zone, and represents 2-5cm increment.

*Sensor distance range scope is around/between 7cm-35cm
Auto Search
This button allows the 'automatic' settings of the sensor proximity sensor range. 

HOW TO: 
With remote control facing/pointing towards the sensor, press once, a solid LED light comes on first and briefly followed by 5 LED light flashes. During these flashes, the sensor will auto-calibrate itself and adjust its infrared distance settings in accordance with environment. 

This button can also be used to set the sensor distance manually.
 
For example, once this button is pressed, place hand/object at desired position/distance where you want sensor range to end and it will automatically calculate the distance from sensor module to hand/object.
Standby
This button will put the sensor on standby or 'inactive' mode. This is particularly useful if the tap needs cleaning or simply trying to put the sensor tap 'out of action' during holiday period. When this mode is active, the sensor will not respond to any interaction with it until it's switched ON again. 

HOW TO: 
With remote control facing/pointing towards the sensor, press once, LED light comes on and stays on for 2-3 seconds and then goes off, standby mode is now active.

To disable, press once, LED light comes on and stays on for 2-3 seconds ‘twice’ and then goes off. Standby mode is now disabled.